How Indie Filmmakers Use Green Screen Remover to Build Cinematic Worlds on a Budget
Imagine this.
A person with his partner is standing on an old street from 1962, and all of a sudden, a rocket sound is getting louder. The rocket fell on the building behind them. The person and the partner start running, and everything is destroyed behind them. Things are exploding around them. They are looking for a safe space as fighter jets are just above them in the sky. Suddenly, a stranger grabs the person and pulls him inside the Bunker with his partner. The three of them are sitting inside the dark bunker safely.
Now here is the truth.
None of it was real.
The 1962 city? A small setup in a studio.
The skyline and building destruction? Completely digital.
The things flying around them? Littler explosion.
The entire scene? Built using a Green Screen Remover in Motion Effects.
It is how modern indie filmmakers are creating cinematic worlds, without ever leaving a controlled space.
Breaking the Illusion: What Was Actually Shot
Let us deconstruct that scene.
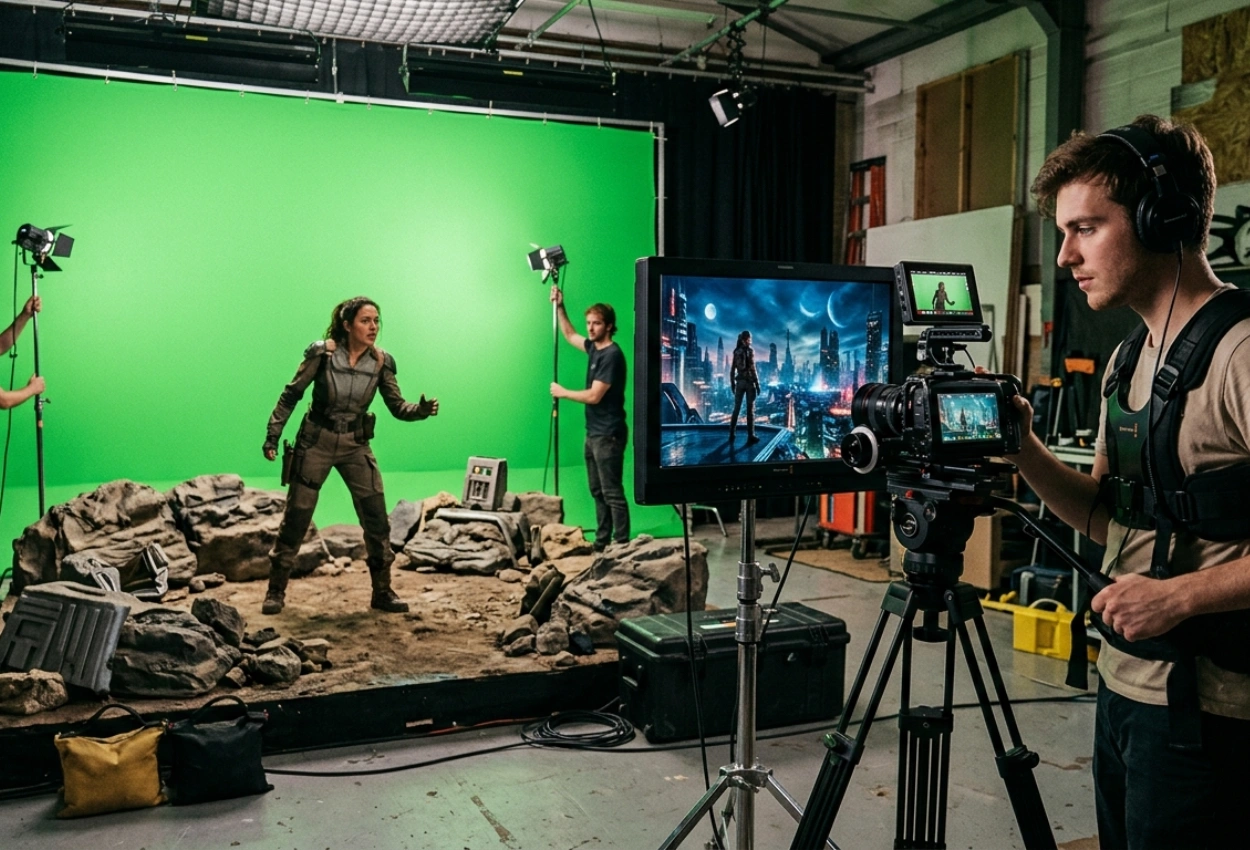
The actors were actually filmed in front of a green background. A well-lit green screen, a camera mounted on a tripod or gimbal, and simple lighting that matched the scene were the only components of the setup.
Capturing the world was not the aim. Capturing performance was the aim.
When the video is ready, editors isolate the subject from the background by removing the green screen. All that is left of the actor is a spotless plate that can be used in any setting.
It is where imagination meets execution.
Step 1: Clean Keying — The Foundation of Everything
Chroma keying is the first step in using a green screen remover, which eliminates the green background while keeping minute details such as motion blur and hair.
However, this is more than a simple click-and-remove procedure.
Editors perform spill suppression. It is the process of removing green reflections from skin and edges. Then, edge refinement, which keeps natural detail intact. After that comes matte cleaning, which ensures no holes or noise in the subject.
Before considering the background, a proficient green screen background editor makes sure the subject appears natural.
Everything else feels phony if this step doesn’t work.
Step 2: Rebuilding the World Digitally
The world-building is about to begin. A combination of 3D environments, matte paintings, stock elements, and procedural lighting is used to create the futuristic city in our imagined scene. Once the green screen is removed from the video, these components are layered behind the subject. However, placement is not arbitrary.
Editors adjust the depth of field, atmospheric haze, lens distortion, and perspective (camera height and angle). It gives the impression that the actor has always been a part of that world.
Step 3: Motion Tracking — Making It Feel Real
The background moves if the camera moves. Motion tracking is useful in this situation.
After analyzing camera movement, editors apply the information to the digital world. It ensures that the scene retains depth, objects shift appropriately with perspective, and background parallax feels natural.
The scene appears flat without tracking. It feels cinematic with tracking.
Step 4: Light Matching and Shadow Integration
Reality is developed by the effects of lighting. The sun glow, blast effect, reflection, and shadows in the 1962 war scene were recreated in post-production rather than on set.
A professional green screen background editor adjusts the softness of the shadow and intensity, light wrap (a subtle glow from background onto subject), color temperature to match the surroundings, and light direction to match digital sources.
At this point, the subject begins to feel grounded and no longer feels cut off.
Step 5: Adding Atmosphere and Movement
The scene now comes to life. Particle effects, atmospheric fog, moving lights in far-off buildings, and ambient motion (such as distant traffic or drones) are examples of subtle additions. Although they are minor details, they provide scale. Independent filmmakers use these methods to create an opulent scene without going over budget.
Step 6: Final Color and Film Integration
The scene still needs coherence even if everything is technically correct. Everything is connected by color grading. Editors balance exposure, color tones, contrast levels, and film grain.
The primary objective of the editor is to make each layer appear as though it were captured simultaneously. A composite becomes a cinematic frame in this last stage.
Why This Changes Everything for Indie Filmmakers
Using a Green Screen Remover workflow, the entire scene—which appeared to be a high-budget production—was produced in a controlled environment.
No pricey places. No travel. Not a big crew. Only post-production, performance, and planning.
For indie filmmakers, this means:
- You can design scenes instead of chasing them
- You can fix limitations in post
- You can build worlds that match your imagination
The power is not in the tool. It is in how you use it.
Conclusion
That war destruction scene felt real because every detail was carefully constructed, step by step. Because every element was meticulously created, step by step, after the shoot, that running scene surrounding destruction felt authentic. From clean keying to motion tracking, from lighting integration to atmospheric layering, the process of removing green screen is not just technical; it is creative.
When you intentionally remove the green screen from a video, you are doing more than just swapping out the background. You are building a world, and Motion Effects assist you in building that.
And for indie filmmakers, that means one thing: your budget no longer defines your vision.
FAQs
1. How do indie filmmakers use a Green Screen Remover to create cinematic scenes?
Indie filmmakers can create cinematic scenes without expensive locations by using a Green Screen Remover to separate actors from the background and place them in digitally created environments.
2. What is the process to remove green screen from video professionally?
Motion Effects’ editors employ chroma keying, spill suppression, edge refinement, motion tracking, and color matching to remove green screen from video and produce a smooth, lifelike composite.
3. Can a green screen background editor create entire worlds for films?
Yes, a skilled green screen background editor can create entire cinematic worlds around the subject by combining 3D environments, matte paintings, and visual effects.
4. Why is motion tracking important in green screen editing?
After using a Green Screen Remover, motion tracking makes sure that digital backgrounds move organically with the camera, giving the scene more depth and realism.
5. Is green screen editing suitable for low-budget filmmaking?
Absolutely. Green screen workflows enable independent filmmakers to control production environments, lower location costs, and produce excellent visuals on a tight budget.